우분투 7.10을 설치한 이후 윈도 XP가 뜨지 않는다는 제보(?)가 심심치 않게 들립니다. 이 경우에 어떻게 하는지에 대하여 아래 써 놓았는데도 많은 분들이 조금 혼동스럽게 생각하고 있습니다.
따라서 그림을 곁들여 우분투 7.10을 설치한 후 윈도 XP가 뜨지 않을 때의 복구 방법을 설명할까 합니다.
- 윈도 XP의 복구가 가능한 경우
- 우분투를 설치한 후 윈 XP가 뜨지 않음
- 마운트된 드라이브를 보면 'sda1'(또는 개인 환경에 따라서 'sda2'로 존재할 경우도 있습니다.)이 존재하고 그 안 폴더를 보면 "Windows"폴더 및 XP환경에서의 여러 폴더가 존재함 - 마운트 된 하드에서 Windows"폴더 및 XP환경에서의 여러 폴더가 존재하는지 찾아 보시라는 이야기입니다.
- 윈도 XP의 복구가 불가능한 경우
- 우분투를 설치한 후 윈 XP가 뜨지 않음
- 마운트된 드라이브를 열어 아무리 찾아 봐도 Windows"폴더 및 XP환경에서의 여러 폴더가 보이지 않음 - 기존 윈 XP 드리이브가 포멧된 경우입니다. 불가합니다.
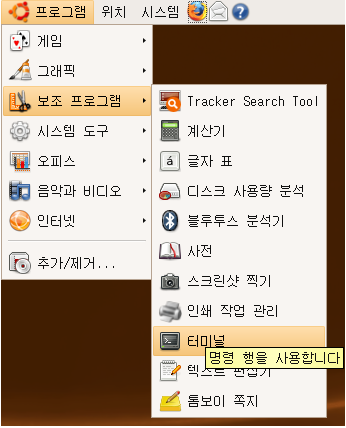
- 자신의 시스템이 복구 가능한지 확인하셨으면 아래 <그림 1>을 참고하여 터미널을 엽니다.
<그림 1>
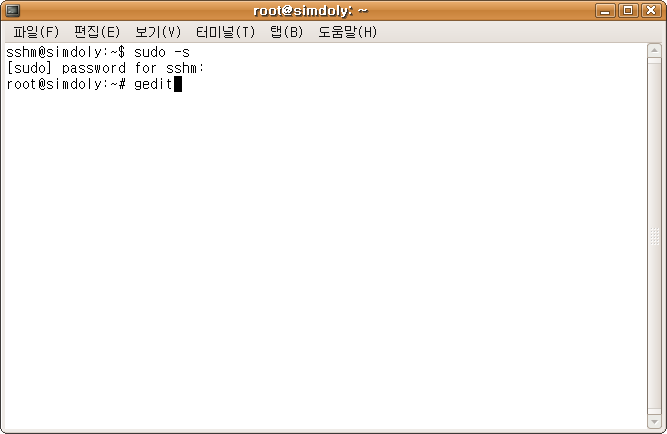
아래 <그림 2>를 참고하여 root 계정으로 gedit를 띄워 작업합니다.계정@ubuntu:~$ sudo -s - root로 들어갑니다.
[sudo] password for 계정: - root 암호를 넣습니다.
root@ubuntu:~# gedit - gedit( 텍스트 편집기)을 엽니다.
<그림 2>
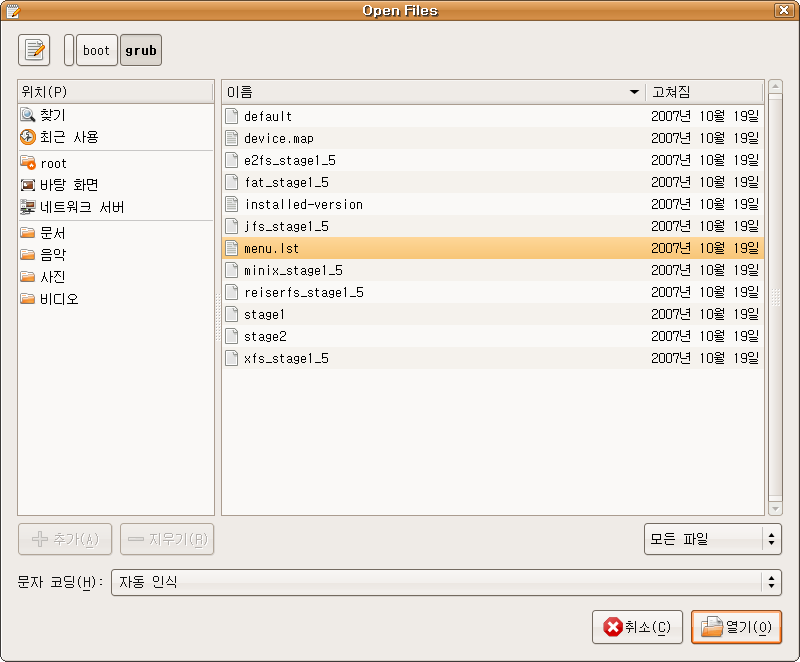
'menu.lst'의 경로는 아래와 같으며 이해가 되지 않는 분은 <그림 3>을 참조하시기 바랍니다.
/boot/grub/menu.lst
<그림 3>
위 <그림 3>을 참조하시면 "menu.lst"가 열립니다. 이를 사정에 맞게 수정하시면 됩니다.
- 아래는 제 시스템(우분투 7.10)의 "menu.lst"이며 이를 수정하는 방법을 간단하게 적었습니다.(파일로 첨부되어 있기도 합니다.) 영어로 되어 있지만 잘 읽어 보시면 어렵지 않게 되어 있습니다. 몇 번 만져보는 수고를 하시면 쉽게 수정하실 수 있습니다.
- 나의 menu.lst
- 전제 : 각 줄의 명령이 유효하게 하시려면 각 줄 맨 앞의 "#"표시를 지우시면 됩니다.
# menu.lst - See: grub(8), info grub, update-grub(8)
# grub-install(8), grub-floppy(8),
# grub-md5-crypt, /usr/share/doc/grub
# and /usr/share/doc/grub-doc/.
## default num
# Set the default entry to the entry number NUM. Numbering starts from 0, and
# the entry number 0 is the default if the command is not used.
#
# You can specify 'saved' instead of a number. In this case, the default entry
# is the entry saved with the command 'savedefault'.
# WARNING: If you are using dmraid do not use 'savedefault' or your
# array will desync and will not let you boot your system.
default 0
## timeout sec - 처음 grub가 뜰 때의 시간을 나타냅니다. 아마 이 시간을 0으로 하면 가장 위에 올라온 시스템(우분투)으로만 부팅되겠죠.
# Set a timeout, in SEC seconds, before automatically booting the default entry
# (normally the first entry defined).
timeout 10 -10초로 지정되어 있습니다.
## hiddenmenu -말 그대로 메뉴를 숨기는 것입니다. "ESC"를 누르면 나타난다고 되어 있죠?
# Hides the menu by default (press ESC to see the menu)
#hiddenmenu - 앞의 #을 지우시면 구동시 grub는 "hiddenmenu"를 실행합니다.
# Pretty colours
#color cyan/blue white/blue
## password ['--md5'] passwd
# If used in the first section of a menu file, disable all interactive editing
# control (menu entry editor and command-line) and entries protected by the
# command 'lock'
# e.g. password topsecret
# password --md5 $1$gLhU0/$aW78kHK1QfV3P2b2znUoe/
# password topsecret
#
# examples - 예를 적어 놨네요.
#
# title Windows 95/98/NT/2000
# root (hd0,0) - C드라이브의 첫번째 파티션
# makeactive
# chainloader +1
#
# title Linux
# root (hd0,1) - C드라이브의 첫번째 파티션
# kernel /vmlinuz root=/dev/hda2 ro
#
#
# Put static boot stanzas before and/or after AUTOMAGIC KERNEL LIST
### BEGIN AUTOMAGIC KERNELS LIST
## lines between the AUTOMAGIC KERNELS LIST markers will be modified
## by the debian update-grub script except for the default options below
## DO NOT UNCOMMENT THEM, Just edit them to your needs
## ## Start Default Options ##
## default kernel options
## default kernel options for automagic boot options
## If you want special options for specific kernels use kopt_x_y_z
## where x.y.z is kernel version. Minor versions can be omitted.
## e.g. kopt=root=/dev/hda1 ro
## kopt_2_6_8=root=/dev/hdc1 ro
## kopt_2_6_8_2_686=root=/dev/hdc2 ro
# kopt=root=UUID=451e8690-c177-4720-8ee5-090837eae5e1 ro
## Setup crashdump menu entries
## e.g. crashdump=1
# crashdump=0
## default grub root device
## e.g. groot=(hd0,0)
# groot=(hd0,2)
## should update-grub create alternative automagic boot options
## e.g. alternative=true
## alternative=false
# alternative=true
## should update-grub lock alternative automagic boot options
## e.g. lockalternative=true
## lockalternative=false
# lockalternative=false
## additional options to use with the default boot option, but not with the
## alternatives
## e.g. defoptions=vga=791 resume=/dev/hda5
# defoptions=quiet splash
## should update-grub lock old automagic boot options
## e.g. lockold=false
## lockold=true
# lockold=false
## Xen hypervisor options to use with the default Xen boot option
# xenhopt=
## Xen Linux kernel options to use with the default Xen boot option
# xenkopt=console=tty0
## altoption boot targets option
## multiple altoptions lines are allowed
## e.g. altoptions=(extra menu suffix) extra boot options
## altoptions=(recovery) single
# altoptions=(recovery mode) single
## controls how many kernels should be put into the menu.lst
## only counts the first occurence of a kernel, not the
## alternative kernel options
## e.g. howmany=all
## howmany=7
# howmany=all
## should update-grub create memtest86 boot option
## e.g. memtest86=true
## memtest86=false
# memtest86=true
## should update-grub adjust the value of the default booted system
## can be true or false
# updatedefaultentry=false
## should update-grub add savedefault to the default options
## can be true or false
# savedefault=false
## ## End Default Options ## - 아래부터가 grub메뉴에 나타나는 OS들이 순서입니다.
title Ubuntu 7.10, kernel 2.6.22-14-generic - 우분투
root (hd0,2) - 디폴트 드라이브의 세번째 파티션
kernel /boot/vmlinuz-2.6.22-14-generic root=UUID=451e8690-c177-4720-8ee5-090837eae5e1 ro quiet splash
initrd /boot/initrd.img-2.6.22-14-generic
quiet
title Ubuntu 7.10, kernel 2.6.22-14-generic (recovery mode)
root (hd0,2)
kernel /boot/vmlinuz-2.6.22-14-generic root=UUID=451e8690-c177-4720-8ee5-090837eae5e1 ro single
initrd /boot/initrd.img-2.6.22-14-generic
title Ubuntu 7.10, memtest86+
root (hd0,2)
kernel /boot/memtest86+.bin
quiet
### END DEBIAN AUTOMAGIC KERNELS LIST
# This is a divider, added to separate the menu items below from the Debian
# ones.
title Other operating systems:
root
# This entry automatically added by the Debian installer for a non-linux OS
# on /dev/sda1
title Microsoft Windows XP Professional - 윈 XP
root (hd0,0) - 디폴트 하드의 첫번째 파티션
savedefault
makeactive
chainloader +1
여기까지가 제 "menu.lst"의 내용인데요, 빨간 글씨는 저의 설명입니다. 좀 어렵게 느껴 지실 것 같은데요, 쉽게 정리하면 아래와 같습니다.
2. 경로를 찾아( /boot/grub/menu.lst) menu.lst 파일을 연다.
3. menu.lst 파일을 아래와 같이 수정한다.
## ## End Default Options ##
여기
title Ubuntu gutsy (development branch), kernel 2.6.22-13-generic
root (hd0,2)
kernel /boot/vmlinuz-2.6.22-13-generic root=UUID=d4054918-443a-46cb-a7c7-864c0bd00dd7 ro quiet splash
initrd /boot/initrd.img-2.6.22-13-generic
부분이 나오는데, 이 부분 다음에
title Windows 95/98/NT/2000
root (hd0,0)
makeactive
chainloader +1
라는 네 줄을 입력한다. 이 때 염두해야 할 점은 혹 윈도가 어디에 설치되었는지 확인해야 한다는 것입니다. 대부분은 마스터 드리이브의 처음 파티션("C"라고 하죠.)에 윈도를 설치하기 때문에 위와 같이 입력하면 됩니다만, 혹 파티션을 나눠 두번째 파티션("D")에 윈도를 설치하셨다면 그에 알맞게 위 입력 부분 중에서
root (hd0,0)
를 아래와 같이 조정하셔야 합니다.
root (hd0,0) - 마스터 하드의 첫번째 파티션("C")에 윈도 XP가 설치된 경우
root (hd0,1) - 마스터 하드의 두번째 파티션("D")에 윈도 XP가 설치된 경우
root (hd0,2) - 마스터 하드의 세번째 파티션("E")에 윈도 XP가 설치된 경우
root (hd1,0) - 슬래이브 하드의 첫번째 파티션("C")에 윈도 XP가 설치된 경우
root (hd1,1) - 슬래이브 하드의 두번째 파티션("D")에 윈도 XP가 설치된 경우
root (hd1,2) - 슬래이브 하드의 세번째 파티션("E")에 윈도 XP가 설치된 경우


